Are you facing a year’s worth of learning experiences designed for regular classroom instruction, not knowing where to begin to convert it to a whole new world of learning? (But not in a cool Aladdin/Jasmine kind of way with a song and a flying carpet.)
You probably aren’t describing the experience as shining, shimmering, splendid.
If you’ve typically taught face-to-face, moving to a blended learning (or even completely virtual learning) experience can be daunting.
I’ve got six steps every teacher can follow to prepare to teach in a blended learning situation.
This isn’t the only way, but after giving it hours upon hours of thought, it’s the most methodical and comprehensive method I have come up with.
Hopefully, it will give you some ideas and a starting point for switching your lesson plans to a virtual learning model, even if you don’t do every step.
Step 1: Do a brain dump of things your students create and produce
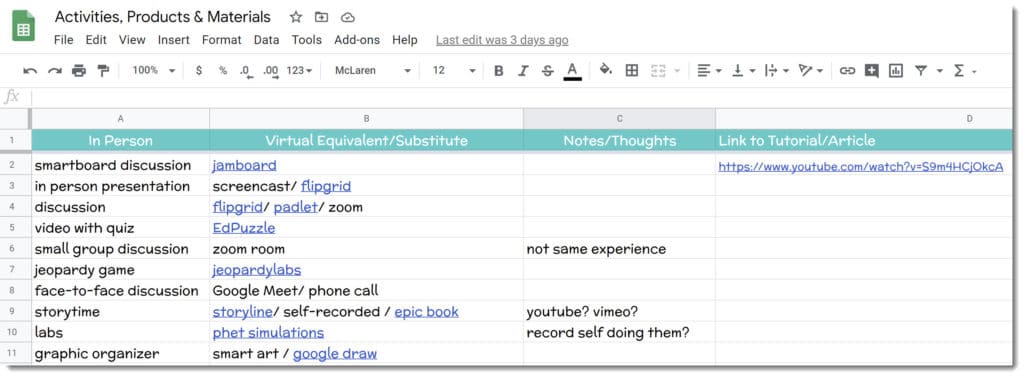
I used a Google Sheet for this.
I made a list of everything I could think of that students produce.
Then, I considered if that product had a virtual equivalent.
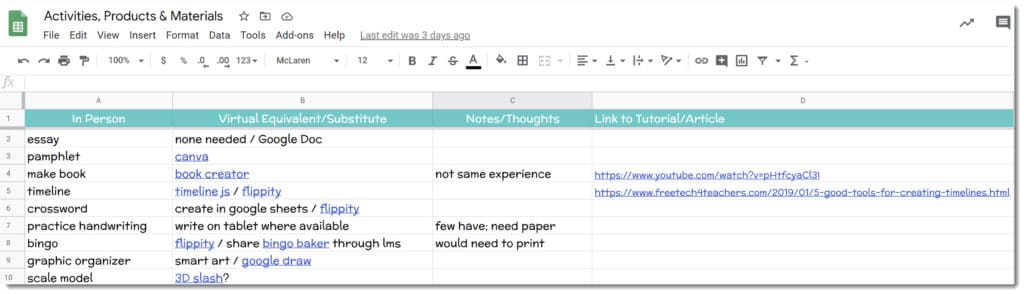
You can see here that I just made a list in Column A of the things students do. In column B, I listed if there was a virtual equivalent.
I added in notes in Column C, and then links to tutorials or articles in Column D.
Step 2: Make a list of all the ways you deliver instruction
Next, I made a list of the various learning activities we do in class.
I considered if there were virtual equivalents or substitutes for them.
I used the same process as for the products they create, adding in notes and links.
In fact, this is just another worksheet in my Google Sheet.
The first list was what the students make; this list is what we do to learn.
It may seem like you should do this first, but I found making the products list easier, so I did it first to get me in the groove of it.
Follow the Pick 5 Rule
If I considered every possible tech tool on the planet, I could come up with substitutes for everything.
However, that has its own downside.
If I need to learn 20 different things, that will not lead to success. It will lead to unnecessary stress.
My suggestion is not to expect yourself to work with more than five unfamiliar tech platforms or tools.
Why?
In addition to stress (which few of us need more of), there is a very real danger that you will not learn the tool well enough to harness its power.
You may find that you are using multiple tools when one would do simply because you didn’t know that the first tool you were using could actually do that thing.
You don’t need five online quiz platforms. Pick one to start.
Here’s an example: Nearpod and Pear Deck both have the ability to make your Google Slides interactive.
They both have great applications. However, you probably don’t need both Nearpod *and* Peardeck, as Nearpod will do most of what Peardeck will do, along with a bunch of things Peardeck won’t do.
In this case, my suggestion would be to use Nearpod and then, once you are familiar with it, add in Peardeck if and only if it has a functionality you really want that you can’t get from Nearpod.
The exception to this would be if your district or school pays for an application and not another, and you need the paid features to get what you want out of the platform.
In general, it’s better to get really comfortable with one tech application than to have twenty that you don’t really have a handle on.
Step 3: Make a list of the materials you use in class.
Think of all the things you and your students touch every day. What are the tangible things you use on a daily basis?
This is the third worksheet in my Google Sheet.

I’ve used the same process, listing the things I use, their virtual equivalents (if there is one), and then notes.
Notice that for some, I’ve noted that there is not a true equivalent.
For all of its wonder and goodness, virtual learning has limitations.
Looking at images someone took of what they saw through their microscope is not anything like the experience of peering through your own microscope, feeling the cold metal against your cheek, focusing the lens and then seeing the slide you prepared leap to life in front of you. It’s just not.
Step 4: Think of your set-up
Do you have the digital storage you need, and is that working for you?
You may find while something worked before, the added strain of larger amounts of materials makes it not useful anymore.
Do you need any new equipment?
Do you want to take time to set up a home streaming station? Some teachers have created backdrops out of foam core board to set behind them while they facilitate in Zoom or Google Meet.
You can even create those cool bitmoji rooms to use in Google Slides.
Hello Teacher Lady has a great tutorial on how to do them, and you can find inspiration on the internet.
We Are Teachers has some examples for inspiration.
You do not need to do this. However, if your favorite part of school is getting your classroom ready for the first day, something like this may fill that need.
Step 5: Make a list of all your lesson plans.
Yes, all of them. Trust me on this.
Make a list of your lesson plans for a grading period at a time, if you like, but this exercise is most helpful if you do the entire year (you’ll see why in a minute).
I used different columns to indicate what the status of that part of the lesson was in relationship to virtual learning.
I used the abbreviation “IP” to indicate “In Person” activities.
By getting granular like this, I can quickly see what needs attention. Rather than thinking, “Oh, man, where do I even begin?”, you can easily see what you need to do.

As you can see, I think it’s helpful to break down the lesson into its parts. I don’t actually use the 5E method, but if I did, that’s how I’d divide it.
I usually have these sections of the lesson:
- anticipatory set (the Engage of 5E)
- instruction delivery
- practice
- product
- review of past learning
If you list the subsections of your lessons, you’ll be able to see more clearly what needs adjustment.
Number the lessons.
I got the idea for numbering lessons from Kasey Bell, who credited someone else whose name I can’t remember.
When you number them, it makes searching for them easier, and your computer will likely sort them automatically in order for you if your files are named with the number.
That may save a minute here and there, and those minutes add up.
Step 6: Put it all together
Now, the beauty of this system reveals itself.
Look at your sheet with the lessons listed (Step 5).
Consider the information you collected and identified in the previous steps and make a deliberate decision of what changes you could make that would make the greatest number of your lesson plans workable in a virtual format.
This is why breaking the lesson down into its parts is helpful. It lets you see (and search) similar issues.
Not all adjustments are equally useful. Look for those with the greatest return on investment.
You might have a lesson that’s a one-off and adjusting it gets you just that one lesson (or even a section of a lesson).
On the other hand, you may realize that by adopting one tech tool or method, you made a dozen lessons ready for virtual learning.
For example, let’s consider that currently your students do writing workshops frequently. If you figure out how to adjust those, you may get fifteen lessons ready.
Not every lesson lends itself to distance learning, and that’s okay.
Knowing which ones don’t is as important as knowing which ones do.
Pro Tip: Don’t worry if you’re adjusting lessons out of order. If you’re using the same technique in multiple lessons, adjust all of those lessons at the same time.
Repeat this until as many lessons as possible are ready for virtual learning.
Bonus Step
One additional thing I think is useful is to create five sub plans that can be delivered virtually and have them available in a way that can be quickly shared.
If you use Google Classroom or other learning management system like Canvas or Blackboard, etc., create a folder just for sub plans that you can deploy at a moment’s notice.
Wrapping Up:
Preparing to teach virtually or in a blended model is an elephant best eaten one bite at a time.
Breaking it down into a planned, strategic method like this has many benefits:
- We save time.
- We have a stronger sense of where we stand.
- We gain control of the process.
- We know how best to allocate our time.
- It feels more do-able.
I hope this has been helpful to you. Perhaps it won’t work for you, but reading it over made you think of something else that would.
Teaching will always be about changing horses while riding them, and the more we focus on developing systems that work for this process, the better off we’ll be.
You May Also Like:
- How to Make Distance Learning Engaging
- Beginning of the Year Parent Forms
- If you’d like to join the thousands of other people just like you who like getting my emails, you can sign up here.